

Have you ever tried to re-render a component or some form of data whenever there's a change in the UI of your application?
You've probably tried to use Hooks to effect (pun intended :-) ) this change and where needed you've applied some prop values. Well you've just managed the state of your application.
But while this might be effective for your small and simple project, it's actually a reductant approach and might prove ineffective when you start working on bigger and more complex applications.
In this article, we'll be looking at the basics of state in React and how to manage it using Redux Toolkit (RTK).
State and state management is one of the most complex concepts for developers and quite rightly so.
The state is a built-in JavaScript object that contains the data and information about a component.
This data is dynamic and can be modified overtime. When they do, the component re-renders to reflect the necessary changes.
The change in state of a component can occur as a response to a user's action or a system generated event, either way these changes needs to be managed.
The state of an application helps us to track the changing data in a component and managing the state of application simply means managing the reaction of an application's component to these state changes.
There are 4 different kinds of states in React with different ways to mange them. However in this article, we'll be focusing on managing the Global state which is the state across multiple components.
Although this article is beginner friendly, I suggest you know a little bit of JavaScript and React in order to fully grasp the ideas, code and logic.
State Management using RTK
Let's imagine for a second we have a dashboard application in react where we display the user's information across multiple components like the Navbar, main page and possibly the footer.
This is a dynamic information that can change overtime ie it depends on the user's action.
Let's say the user wants to update the username and email, we have to somehow track this change and dynamically render it across the multiple components.
To do this, we could create the variables at the top level of our react application, and pass it as a prop down to its child components and then to its grandchild till we get to the components where it is needed. This is known as prop-drilling.
While this might work, it is redundant and makes it hard to maintain our application in the future.
Also we are often left with unnecessary prop values in components where they are not needed across multiple points in our application. To tackle this, we use state management tools like the Redux Toolkit.
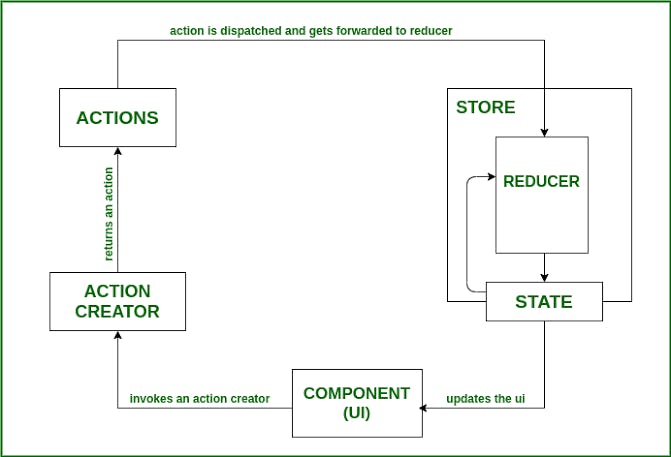
The Redux Toolkit provides a very simple and straightforward solution: create a store independent from any component and then make it accessible to every component at all levels of our application.
Here are the steps in using the Redux Toolkit:
Install and Configure the Redux Toolkit and Redux
Create a Redux Folder (preferably)
Create a Slice
Create a store
Provide Store to React at the top most component
Proceed to use the store values anywhere across the application.
I'll be explaining each of these steps below, let's go! But first, go ahead and create your react application as I won't be going over that.
We'll be using the user information example we discussed earlier and also try to update the information across multiple components in our application.
Install and Configure Redux and Redux Toolkit.
In your terminal, type the following lines of code
npm install @reduxjs/toolkit react-redux
This will install and configure the Redux Toolkit
Create a Redux folder
Create a Folder for the Redux Logic preferably inside the src folder of your application. Let's call this folder redux.
Create a Redux Slice
Create a new file and name it userSlice.js. A slice is simply just a collection of our redux reducer logic and actions for a single feature in your react application defined together in a single file. Type in the following code snippet
import {createSlice} from "@reduxjs/toolkit"
export const userSlice = createSlice ({
  name: "user",
  initialState: {
   username: "Tonie"
   email: "tonie@email.com"
  },
  reducers: {
   update: (state, action) => {
    state.username = action.payload.username;
    state.email= action.payload.email
   },
  },
})
export const {update} = userSlice.actions;
export default userSlice.reducer
What is happening here?
The name represents the name of our slice, in this case, we've chosen "user"
InitialState: This sets the initial or default state of our react element.
Reducers: This contains all the logic and actions that is used to update our state.
The action.payload tracks the changes to our state and passes it to the necessary state variables.
Create a Store
In React, a store is a state container which holds the application's state. Redux can have only a single store in your application and you have to specify or add our reducers from our slice to it. Type in the following in your redux store file.
import {configureStore} from "@reduxjs/toolkit"
import userReducer from './userSlice'
//this is a default export, that's why we could name it this way. It is our reducer in our slice

export default configureStore ({
 reducer: {
  user: userReducer,
 }
});
Provide the Redux Store to React
Once the store has been created, we can make it available to our React components by putting a React-Redux around our application in src/index.js. Import the Redux store we just created, put a around your , and pass the store as a prop:
import React from 'react'
import ReactDOM from 'react-dom'
import './index.css'
import App from './App'
import { store } from './app/store'
import { Provider } from 'react-redux'

ReactDOM.render(
  <Provider store={store}>
    <App />
  </Provider>,
  document.getElementById('root')
)
Proceed to use the store values anywhere across the application.
Now we can use the React-Redux hooks to let React components interact with the Redux store. We can read data from the store with useSelector, and dispatch actions using useDispatch hooks respectively.
To access the data from the store using the useSelector hook in any component, just type in the following code snippet.
import React from "react"
import { useSelector } from "react-redux"

export function Navbar() {
 const name = useSelector( (state) => state.user.username)

 const email = useSelector( (state) => state.user.email)
//Then we can proceed to use these variables to represent the name and email in out
}
This will assign the variables of name and email to the values contained in the store.
To change or update the values of our store variables, we make use of the useDispatch hook.
Let's say we have a form and a button that handles this update on the Update component of our application. And we want to update our user information we do it like so:
import { useState } from "react";
import { useSelector, useDispatch } from "react-redux";
import { update } from "../redux/userSlice";

export default function Update () {
 const [ name, setName ] = useState(" ");
 const [ email, setEmail ] = useState(" ");
 const user = useSelector ( (state) => (state.user) )
 const dispatch = useDispatch();

 //Here we de-structure the user object and assign respective values.
 user {
  username: name,
  email: email
 }

 const handleUpdate = (e) => {
  e.preventDefault();
  dispatch(update(user))
 };

<>
 <form>
  <input
   placeholder = "username"
   onChange = {(e) => setName(e.target.value)}
   />
  <input
   placeholder = "email"
   onChange = {(e) => setEmail(e.target.value)}
  />
  <button onClick = {handleUpdate}>
   Update
  <button/>
 <form>
</>
};
As the name suggests the dispatch simply sends the action of our slice's reducer to the store. Hence performing the necessary updates and changes.
And that's a wrap, as we have seen, Redux toolkit makes it easier for us to manage state in react.
Although it might seem complex now, with some practice you should get familiar with it and use it effectively in your application.
Let me know in the comment section if you have questions or suggestions.
If you found this insightful, do well to share with your friends across your social media platforms.
Happy coding 💫