

When it comes to processing online payments, offering a diverse range of payment options is crucial for e-commerce applications. While MedusaJS provides native support for popular payment gateways, you may have specific requirements that necessitate integrating a custom payment gateway like Paystack. In this article, we will guide you through the process of implementing Paystack as a custom payment gateway in MedusaJS, empowering you to offer seamless payment experiences to your customers.
What is MedusaJS?
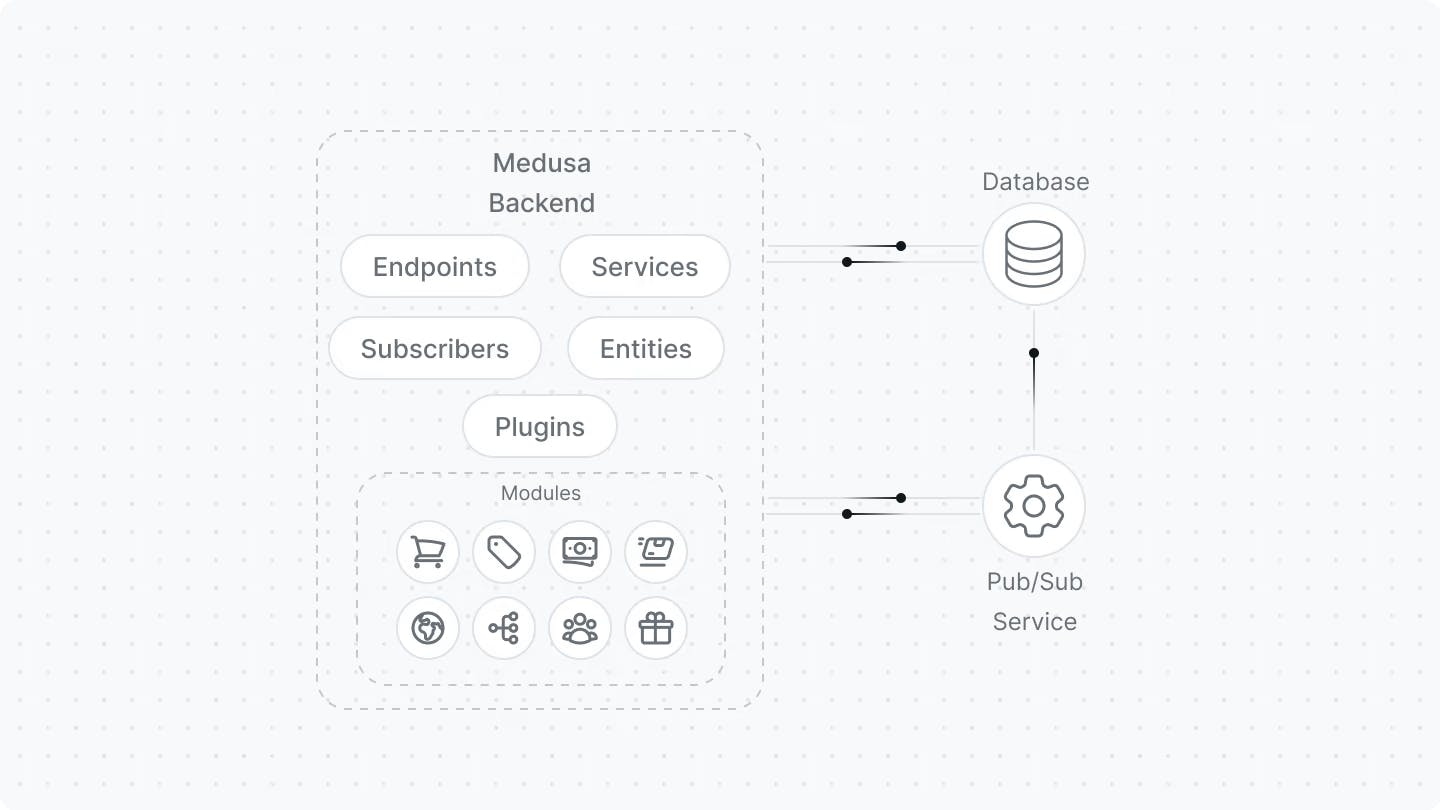
Medusa is an open-source, composable commerce platform specifically designed for developers. With its flexible architecture, MedusaJS empowers users to build highly customized commerce solutions catering to their needs. By providing modular commerce infrastructure, Medusa simplifies the custom development process, allowing developers to focus on creating unique and tailored e-commerce experiences.
You can learn more about the Medusa architecture in their official documentation.
One of the key strengths of MedusaJS is its ability to leverage cutting-edge infrastructure technologies. It embraces serverless architecture and employs edge workers to ensure exceptional scalability, reliability, and performance. This enables online stores built on Medusa to handle increasing traffic and deliver seamless user experiences, even during peak periods.
Why Paystack?
Paystack is a popular payment gateway used across several countries in Africa. It offers a developer-friendly API, and robust security features, and supports various payment methods.
Integrating Paystack into a Medusa store offers several benefits, including a developer-friendly API, robust security measures, and support for multiple payment methods.
Prerequisite
To fully understand the content of this article, you will need the following:
A recent version of node v16+
Yarn (or npm) installed on your computer
A code editor
A Paystack account (If you do not have one you can sign up using this link)
Git
PostgreSQL
Setting up Medusa Backend and Admin Dashboard
In this section, we'll go through how to set and configure the Medusa backend and admin dashboard.
The Medusa Backend acts as the core element accountable for managing the logic and data of the store. It provides REST APIs that are utilized by the Medusa Admin and Storefront for tasks such as data retrieval, creation, and modification.
Installing the Medusa backend and Admin Dashboard
Follow these steps to install the Medusa backend and admin dashboard.
Open your terminal and run the following command:
yarn create medusa-app
You'll be prompted to enter the name of your project which will be used to create your project directory. You can use the default name
my-medusa-storeor any name of your choice.Next, you will be asked to provide the necessary PostgreSQL database credentials, including the username and password. If the credentials are valid, you can proceed to the next step.
These credentials will be utilized to establish a database during the setup process and configure your Medusa backend to establish a connection with that database.
You'll then be asked to enter an email for your admin user. This email will be used to signup on your admin dashboard.
After these, the setup process will begin and on completion, the Medusa backend will start and the admin dashboard will be opened in your default browser. This is where you sign up using the email you provided during the setup process.
Follow the tutorial steps on the dashboard to create your first product.
Installing packages and configuring the backend.
Open your terminal and type in the following command to install the medusa-payment-paystack plugin.
yarn add medusa-payment-paystack
This adds Paystack as a payment provider to Medusa e-commerce stores.
Open your project with your code editor and go to the .env file. Here you'll have to add your paystack secret key using the following format You can get your secret key from the setting page on your paystack admin dashboard.
PAYSTACK_SECRET_KEY=yourpaystacksecretkey
Navigate to the `medusa-config.js` file and add the following lines of code within the plugins array
  {
    resolve: `medusa-payment-paystack`,
    options: {
      secret_key: PAYSTACK_SECRET_KEY, //declare this as a variable just above your plugin
    },
  },
Your medusa-config.js file should look like this
const dotenv = require("dotenv");

let ENV_FILE_NAME = "";
switch (process.env.NODE_ENV) {
  case "production":
    ENV_FILE_NAME = ".env.production";
    break;
  case "staging":
    ENV_FILE_NAME = ".env.staging";
    break;
  case "test":
    ENV_FILE_NAME = ".env.test";
    break;
  case "development":
  default:
    ENV_FILE_NAME = ".env";
    break;
}

try {
  dotenv.config({ path: process.cwd() + "/" + ENV_FILE_NAME });
} catch (e) {}

// CORS when consuming Medusa from admin
const ADMIN_CORS =
  process.env.ADMIN_CORS || "http://localhost:7000,http://localhost:7001";

// CORS to avoid issues when consuming Medusa from a client
const STORE_CORS = process.env.STORE_CORS || "http://localhost:8000";

const DATABASE_URL =
  process.env.DATABASE_URL || "postgres://localhost/medusa-store";

const REDIS_URL = process.env.REDIS_URL || "redis://localhost:6379";
const PAYSTACK_SECRET_KEY = process.env.PAYSTACK_SECRET_KEY;
const STRIPE_API_KEY = process.env.STRIPE_API_KEY;

const plugins = [
  `medusa-fulfillment-manual`,
  `medusa-payment-manual`,
  {
    resolve: `@medusajs/file-local`,
    options: {
      upload_dir: "uploads",
    },
  },
  {
    resolve: `medusa-payment-stripe`,
    options: {
      api_key: STRIPE_API_KEY,
    },
  },
  {
    resolve: `medusa-payment-paystack`,
    options: {
      secret_key: PAYSTACK_SECRET_KEY,
    },
  },
  {
    resolve: "@medusajs/admin",
    /** @type {import('@medusajs/admin').PluginOptions} */
    options: {
      autoRebuild: true,
      develop: {
        open: process.env.OPEN_BROWSER !== "false",
      },
    },
  },
];

const modules = {
  /*eventBus: {
    resolve: "@medusajs/event-bus-redis",
    options: {
      redisUrl: REDIS_URL
    }
  },
  cacheService: {
    resolve: "@medusajs/cache-redis",
    options: {
      redisUrl: REDIS_URL
    }
  },*/
};

/** @type {import('@medusajs/medusa').ConfigModule["projectConfig"]} */
const projectConfig = {
  jwtSecret: process.env.JWT_SECRET,
  cookieSecret: process.env.COOKIE_SECRET,
  store_cors: STORE_CORS,
  database_url: DATABASE_URL,
  admin_cors: ADMIN_CORS,
  // Uncomment the following lines to enable REDIS
  // redis_url: REDIS_URL
};

/** @type {import('@medusajs/medusa').ConfigModule} */
module.exports = {
  projectConfig,
  plugins,
  modules,
};
And that's all for the backend. Go to your terminal and run yarn start to start up your backend server and admin dashboard.
Adding Paystack as a Payment Option on the Admin Dashboard.
With your backend now configured and running on the terminal. Open up your browser and go to http://localhost:9000/app to access your admin dashboard. Log in using your credentials and use the following steps to Add Paystack as a payment option.
On the navigation panel, click on the settings button to go to the settings page.
Next, click on the + icon to set up a new region or choose an existing region. click on the three dots and select Edit region to edit the details about a particular region.
Enter the necessary details (Country, currency, etc). Scroll to the bottom of the page where you have Payment Providers. If you set up the Medusa backend correctly, you should see
paystackas a payment option. Select it and save.
note: on the settings page you can add a new currency specific to your region by opening the currency tab.
That's all you have to do on your Admin dashboard. Next, we will setup and configure our Storefront.
Setting up and Configuring the Storefront
For the storefront, we'll be using the Medusa Nextjs starter template. Use the following steps to install.
Installing the Storefront
Open your terminal and type run the following
npx create-next-app -e https://github.com/medusajs/nextjs-starter-medusa my-medusa-storefront
After the installation process, change to the newly created directory my-medusa-storefront and rename the template environment variable file to use environment variables in development:
cd my-medusa-storefront
mv .env.template .env
note: running the storefront in a Windows environment throws some errors, you should instead run it on a Linux-like environment.
Installing Packages
Open up your terminal and run the following command to install the react-paystack package:
yarn add react-paystack
//you might need to delete the package-lock.json
This is a React library for implementing a Paystack payment gateway in React applications. It provides us with some vital components and functions to initiate and authorize payments.
Open up your project within your code editor and navigate to the .env file to add your paystack public test key using the format below:
# Paystack Public Key
NEXT_PUBLIC_PAYSTACK_PUBLIC_KEY=yourpublicapikey
Configuring the Paystack Button Component
Next, we will need to add Paystack as a payment provider in the payment button component. Navigate to the /src/modules/checkout/components/payment-button/index.tsx file and update it using the following steps:
First, we import the PaystackButton component from the react-paystack component we installed earlier.
import { PaystackButton } from "react-paystack"
Next, we will add paystack as a case in the switch statement within the PaymentButton function. In this case, we'll return a PayStackPaymentButton component which we'll create in the next step. Update the switch statement to look like this:
switch (paymentSession?.provider_id) {
    case "stripe":
      return (
        <StripePaymentButton session={paymentSession} notReady={notReady} />
      )
    case "paystack":
      return (
        <PayStackPaymentButton session={paymentSession} notReady={notReady} />
      )
    case "manual":
      return <ManualTestPaymentButton notReady={notReady} />
    case "paypal":
      return (
        <PayPalPaymentButton notReady={notReady} session={paymentSession} />
      )
    default:
      return <Button disabled>Select a payment method</Button>
  }
Now, it's time to create the PayStackPaymentButton we used earlier. To do that, create a new component just under the PaymentButton like the one below.
/*
Assigns the value of the environment variable
NEXT_PUBLIC_PAYSTACK_PUBLIC_KEY to PAYSTACK_PUBLIC_KEY
or an empty string if the environment variable is not set
*/
const PAYSTACK_PUBLIC_KEY = process.env.NEXT_PUBLIC_PAYSTACK_PUBLIC_KEY || ""
const PayStackPaymentButton = ({
  session,
  notReady,
}: {
  session: PaymentSession
  notReady: boolean
}) => {
  const { cart } = useCart()
  const { onPaymentCompleted } = useCheckout()

  const txRef = String(session.data?.paystackTxRef)
  const total = cart?.total || 0
  const email = cart?.email || ""
  const currency =
    cart?.region.currency_code.toUpperCase() === "NGN" ? "NGN" : "USD" || "NGN"

  return (
    <PaystackButton
      email={email}
      amount={total}
      reference={txRef}
      publicKey={PAYSTACK_PUBLIC_KEY}
      currency={currency}
      text="Pay with Paystack"
      onSuccess={onPaymentCompleted}
    />
  )
}
The code above defines a component called PayStackPaymentButton which takes two props: session of type PaymentSession and notReady of type boolean.
Within the component, it uses hooks to access the cart and checkout functionalities. It extracts the paystackTxRef from the session data, the total from the cart, and the email from the cart.
Based on the region currency code in the cart, it determines the currency to be either "NGN" or "USD" (defaulting to "NGN" if neither).
Finally, it renders the PaystackButton component imported from the react-paystack library called with various props including the extracted email, total, txRef, PAYSTACK_PUBLIC_KEY, currency, and a success callback function called onPaymentCompleted. which was destructured from the useCheckout hook.
After adding all these changes, your payment button component should look like this
import { useCheckout } from "@lib/context/checkout-context"
import { PaymentSession } from "@medusajs/medusa"
import Button from "@modules/common/components/button"
import Spinner from "@modules/common/icons/spinner"
import { OnApproveActions, OnApproveData } from "@paypal/paypal-js"
import { PayPalButtons, PayPalScriptProvider } from "@paypal/react-paypal-js"
import { useElements, useStripe } from "@stripe/react-stripe-js"
import { useCart } from "medusa-react"
import React, { useEffect, useState } from "react"
import { PaystackButton } from "react-paystack"

type PaymentButtonProps = {
  paymentSession?: PaymentSession | null
}

const PaymentButton: React.FC<PaymentButtonProps> = ({ paymentSession }) => {
  const [notReady, setNotReady] = useState(true)
  const { cart } = useCart()

  useEffect(() => {
    setNotReady(true)

    if (!cart) {
      return
    }

    if (!cart.shipping_address) {
      return
    }

    if (!cart.billing_address) {
      return
    }

    if (!cart.email) {
      return
    }

    if (cart.shipping_methods.length < 1) {
      return
    }

    setNotReady(false)
  }, [cart])

  switch (paymentSession?.provider_id) {
    case "stripe":
      return (
        <StripePaymentButton session={paymentSession} notReady={notReady} />
      )
    case "paystack":
      return (
        <PayStackPaymentButton session={paymentSession} notReady={notReady} />
      )
    case "manual":
      return <ManualTestPaymentButton notReady={notReady} />
    case "paypal":
      return (
        <PayPalPaymentButton notReady={notReady} session={paymentSession} />
      )
    default:
      return <Button disabled>Select a payment method</Button>
  }
}

const PAYSTACK_PUBLIC_KEY = process.env.NEXT_PUBLIC_PAYSTACK_PUBLIC_KEY || ""
const PayStackPaymentButton = ({
  session,
  notReady,
}: {
  session: PaymentSession
  notReady: boolean
}) => {
  const { cart } = useCart()
  const { onPaymentCompleted } = useCheckout()

  const txRef = String(session.data?.paystackTxRef)
  const total = cart?.total || 0
  const email = cart?.email || ""
  const currency =
    cart?.region.currency_code.toUpperCase() === "NGN" ? "NGN" : "NGN" || "NGN"

  return (
    <PaystackButton
      email={email}
      amount={total}
      reference={txRef}
      publicKey={PAYSTACK_PUBLIC_KEY}
      currency={currency}
      text="Pay with Paystack"
      onSuccess={onPaymentCompleted}
    />
  )
}

const StripePaymentButton = ({
  session,
  notReady,
}: {
  session: PaymentSession
  notReady: boolean
}) => {
  const [disabled, setDisabled] = useState(false)
  const [submitting, setSubmitting] = useState(false)
  const [errorMessage, setErrorMessage] = useState<string | undefined>(
    undefined
  )

  const { cart } = useCart()
  const { onPaymentCompleted } = useCheckout()

  const stripe = useStripe()
  const elements = useElements()
  const card = elements?.getElement("cardNumber")

  useEffect(() => {
    if (!stripe || !elements) {
      setDisabled(true)
    } else {
      setDisabled(false)
    }
  }, [stripe, elements])

  const handlePayment = async () => {
    setSubmitting(true)

    if (!stripe || !elements || !card || !cart) {
      setSubmitting(false)
      return
    }

    await stripe
      .confirmCardPayment(session.data.client_secret as string, {
        payment_method: {
          card: card,
          billing_details: {
            name:
              cart.billing_address.first_name +
              " " +
              cart.billing_address.last_name,
            address: {
              city: cart.billing_address.city ?? undefined,
              country: cart.billing_address.country_code ?? undefined,
              line1: cart.billing_address.address_1 ?? undefined,
              line2: cart.billing_address.address_2 ?? undefined,
              postal_code: cart.billing_address.postal_code ?? undefined,
              state: cart.billing_address.province ?? undefined,
            },
            email: cart.email,
            phone: cart.billing_address.phone ?? undefined,
          },
        },
      })
      .then(({ error, paymentIntent }) => {
        if (error) {
          const pi = error.payment_intent

          if (
            (pi && pi.status === "requires_capture") ||
            (pi && pi.status === "succeeded")
          ) {
            onPaymentCompleted()
          }

          setErrorMessage(error.message)
          return
        }

        if (
          (paymentIntent && paymentIntent.status === "requires_capture") ||
          paymentIntent.status === "succeeded"
        ) {
          return onPaymentCompleted()
        }

        return
      })
      .finally(() => {
        setSubmitting(false)
      })
  }

  return (
    <>
      <Button
        disabled={submitting || disabled || notReady}
        onClick={handlePayment}
      >
        {submitting ? <Spinner /> : "Checkout"}
      </Button>
      {errorMessage && (
        <div className="text-red-500 text-small-regular mt-2">
          {errorMessage}
        </div>
      )}
    </>
  )
}

const PAYPAL_CLIENT_ID = process.env.NEXT_PUBLIC_PAYPAL_CLIENT_ID || ""

const PayPalPaymentButton = ({
  session,
  notReady,
}: {
  session: PaymentSession
  notReady: boolean
}) => {
  const [submitting, setSubmitting] = useState(false)
  const [errorMessage, setErrorMessage] = useState<string | undefined>(
    undefined
  )

  const { cart } = useCart()
  const { onPaymentCompleted } = useCheckout()

  const handlePayment = async (
    _data: OnApproveData,
    actions: OnApproveActions
  ) => {
    actions?.order
      ?.authorize()
      .then((authorization) => {
        if (authorization.status !== "COMPLETED") {
          setErrorMessage(`An error occurred, status: ${authorization.status}`)
          return
        }
        onPaymentCompleted()
      })
      .catch(() => {
        setErrorMessage(`An unknown error occurred, please try again.`)
      })
      .finally(() => {
        setSubmitting(false)
      })
  }
  return (
    <PayPalScriptProvider
      options={{
        "client-id": PAYPAL_CLIENT_ID,
        currency: cart?.region.currency_code.toUpperCase(),
        intent: "authorize",
      }}
    >
      {errorMessage && (
        <span className="text-rose-500 mt-4">{errorMessage}</span>
      )}
      <PayPalButtons
        style={{ layout: "horizontal" }}
        createOrder={async () => session.data.id as string}
        onApprove={handlePayment}
        disabled={notReady || submitting}
      />
    </PayPalScriptProvider>
  )
}

const ManualTestPaymentButton = ({ notReady }: { notReady: boolean }) => {
  const [submitting, setSubmitting] = useState(false)

  const { onPaymentCompleted } = useCheckout()

  const handlePayment = () => {
    setSubmitting(true)

    onPaymentCompleted()

    setSubmitting(false)
  }

  return (
    <Button disabled={submitting || notReady} onClick={handlePayment}>
      {submitting ? <Spinner /> : "Checkout"}
    </Button>
  )
}

export default PaymentButton
Finally, we need to add Paystack as an option in our payment element. Navigate to /src/modules/checkout/components/payment-element/index.tsx and update the PaymentInfoMap object to look like this
const PaymentInfoMap: Record<string, { title: string; description: string }> = {
  stripe: {
    title: "Credit card",
    description: "Secure payment with credit card",
  },
  "stripe-ideal": {
    title: "iDEAL",
    description: "Secure payment with iDEAL",
  },
  paypal: {
    title: "PayPal",
    description: "Secure payment with PayPal",
  },
  paystack: {
    title: "Paystack",
    description: "Secure payment with Paystack",
  },
  manual: {
    title: "Test payment",
    description: "Test payment using medusa-payment-manual",
  },
}
This code defines a constant variable named "PaymentInfoMap" as an object with key-value pairs. The keys are strings representing various payment methods, and the values are objects with two properties: "title" and "description".
And voila, you've successfully integrated the Paystack payment processor into the Medusa e-commerce application. Here's a quick demo of the checkout process
Conclusion
In this article, we've covered how to implement a custom payment processor like Paystack into a Medusa e-commerce application.
The process involves setting up the Medusa backend and admin dashboard, installing the necessary packages, configuring the backend to include the Paystack plugin, and adding Paystack as a payment option in the admin dashboard. Additionally, the storefront needs to be set up and configured to integrate Paystack as a payment provider. This includes installing the Medusa Next.js starter template, configuring the Paystack button component in the payment button module, and adding paystack as an option in the payment element.
By following these steps, you can successfully integrate Paystack into MedusaJS and offer seamless payment experiences to customers. The integration of Paystack expands the payment options available to customers, enhances security, and ensures a smooth checkout process, ultimately improving the overall user experience and driving customer satisfaction.
Resources
Medusa Documentation: The official documentation of Medusa provides in-depth information about the platform's features, architecture, and usage. It serves as a comprehensive guide to help you understand and utilize Medusa effectively.
Medusa GitHub Repository: The GitHub repository of Medusa houses the source code, issue tracker, and community contributions. You can explore the repository to access the latest updates, contribute to the project, or report any issues you encounter.
Paystack Documentation: If you want to delve deeper into Paystack's capabilities and explore its features, the Paystack documentation provides comprehensive resources, including API references, integration guides, and troubleshooting tips.
Article Code Repository: Access the GitHub repository containing the code for this article to explore the complete implementation of the Paystack custom payment gateway in Medusa. The repository includes the backend and frontend code, as well as instructions for setup and configuration.